
ContextMenus are a staple in any WPF desktop application. I honestly can’t think of a single WPF application that didn’t use a ContextMenu. Most of the time, these ContextMenus are placed within the content of the application. Maybe you have a grid of records, you right-click a record, and get a ContextMenu to act on the selected record.
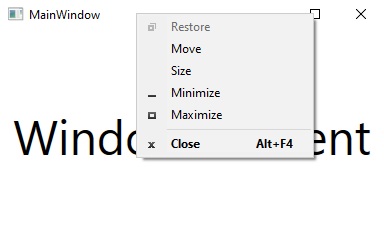
However, what happens when you want to place a custom ContextMenu on the actual Window that is hosting the content of your WPF Application? By default, if you right-click on the Window title bar, you will get the default Window ContextMenu.
In our case however, we want to replace this ContextMenu with our own. How do we do that? It’s easy! First. you have to realize that we are no longer in XAML land. We are dealing with the native system menu associated with the Window Chrome. This means we need to use interop to achieve our goal of using a custom ContextMenu on a WPF Window title bar.
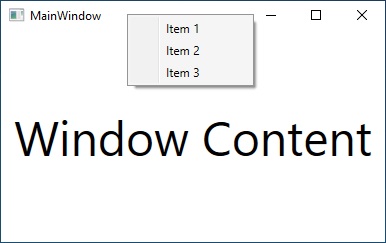
First, let’s create a very simple ContextMenu that we will be using as the custom ContextMenu for the WPF window title bar. We will create this ContextMenu as a Resource in our Window, and add an event handler for when the menu items are clicked:
<Window.Resources>
    <ContextMenu x:Key="contextMenu" MenuItem.Click="ContextMenu_Click">
        <MenuItem Header="Item 1"/>
        <MenuItem Header="Item 2"/>
        <MenuItem Header="Item 3"/>
    </ContextMenu>
</Window.Resources>

private void ContextMenu_Click(object sender, RoutedEventArgs e)
{
    var item = e.OriginalSource as MenuItem;
    MessageBox.Show($"{item.Header} was clicked");
}
Next, let’s add a Loaded event handler to our Window. In this handler, we are going to use the WindowInteropHandler to add a hook to the Window’s messaging:
public MainWindow()
{
    InitializeComponent();
    Loaded += MainWindow_Loaded;
}

private void MainWindow_Loaded(object sender, RoutedEventArgs e)
{
    IntPtr windowhandle = new WindowInteropHelper(this).Handle;
    HwndSource hwndSource = HwndSource.FromHwnd(windowhandle);
    hwndSource.AddHook(new HwndSourceHook(WndProc));
}

private IntPtr WndProc(IntPtr hwnd, int msg, IntPtr wParam, IntPtr lParam, ref bool handled)
{
    return IntPtr.Zero;
}
Now, let’s modify the WndProc method to listen for the right button down message. When this message occurs, we want to show our custom ContextMenu and prevent the default system ContextMenu from showing.
//The WM_NCRBUTTONDOWN message is posted when the user presses the right mouse button while the cursor is within the nonclient area of a window.
private const uint WM_NCRBUTTONDOWN = 0xa4;

//window message parameter for the hit test in the title bar
private const uint HTCAPTION = 0x02;

private IntPtr WndProc(IntPtr hwnd, int msg, IntPtr wParam, IntPtr lParam, ref bool handled)
{
    //Message for the right click
    if ((msg == WM_NCRBUTTONDOWN ) && (wParam.ToInt32() == HTCAPTION))
    {
        //Show our context menu
        ShowContextMenu();

        //prevent default context menu from appearing
        handled = true;
    }

    return IntPtr.Zero;
}

private void ShowContextMenu()
{
    var contextMenu = Resources["contextMenu"] as ContextMenu;
    contextMenu.IsOpen = true;
}
Now, run the app and right-click the Window title bar.
Pretty slick right?! Well, try clicking on an item now.
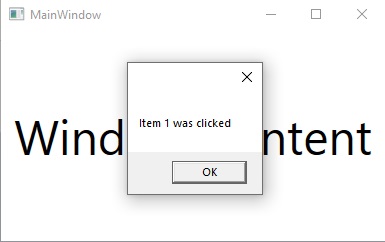
BAM! Our click event is invoked just as we expect.
That’s it! That’s how simple is it to replace the default WPF Window ContextMenu with our very own custom ContextMenu.