
The .NET team has just released preview2 of .NET 10, and it’s got a bundle of new features and improvements. You might want to give these a try but don’t want to mess with your local development environment. A great way to try out a .NET preview is by using dev containers. In this blog post, we’ll walk you through the steps to set up and use dev containers for experimenting with a new .NET release.
What are Dev Containers?
Dev containers are pre-configured, isolated environments that allow developers to work on projects without worrying about dependencies and configurations. They are particularly useful for trying out new technologies, as they provide a consistent and reproducible setup.
Many development environments, including Visual Studio Code, support dev containers. This allows you to easily create and manage these environments.
You can also use dev containers in GitHub Codespaces, which provide a cloud-based development environment.
Types of .NET Container Images
There are many types of .NET container images available, each designed for different scenarios. .NET container images are published to the Microsoft Artifact Registry. These images are regularly updated to include the latest patches and features, ensuring that you have access to the most secure and up-to-date versions.
If you want to get more information about a specific .NET container image, such as mcr.microsoft.com/dotnet/nightly/sdk:9.0, you can use one of the following methods:
-
From the Microsoft Artifact Registry: The Microsoft Artifact Registry documentation provides comprehensive information about the .NET container images, including how they are tagged and updated.
-
Use the docker inspect Command: If you have already pulled the image, you can use the docker inspect command to get detailed information about the image. For example:
docker inspect mcr.microsoft.com/dotnet/nightly/sdk:9.0
Some of these images are designed specifically for running .NET applications in production. For exploring a new .NET release, you’ll want to use a dev container image that includes the .NET SDK and runtime. For exploring a preview release, you’ll probably want a dev container for a current GA release augmented with the preview version of .NET 10 you want to try out.
| Container Type | Best For | Example Tag | Notes |
|---|---|---|---|
| SDK | Development | mcr.microsoft.com/dotnet/sdk:9.0 |
Includes full SDK, runtime, and development tools |
| Runtime | Production | mcr.microsoft.com/dotnet/runtime:9.0 |
Smaller image with just the runtime |
| ASP.NET | Web apps | mcr.microsoft.com/dotnet/aspnet:9.0 |
Includes ASP.NET Core runtime |
| Nightly | Testing previews | mcr.microsoft.com/dotnet/nightly/sdk:10.0 |
Latest preview builds |
| Dev Container | Local development | mcr.microsoft.com/devcontainers/dotnet:1-8.0 |
Pre-configured development environment with additional tools |
Setting Up Your Dev Container
To get started with dev containers, you’ll need Docker and Visual Studio Code with the Dev Containers extension installed. Follow these steps to set up your dev container for exploring a new .NET release.
Create a Dev Container Configuration
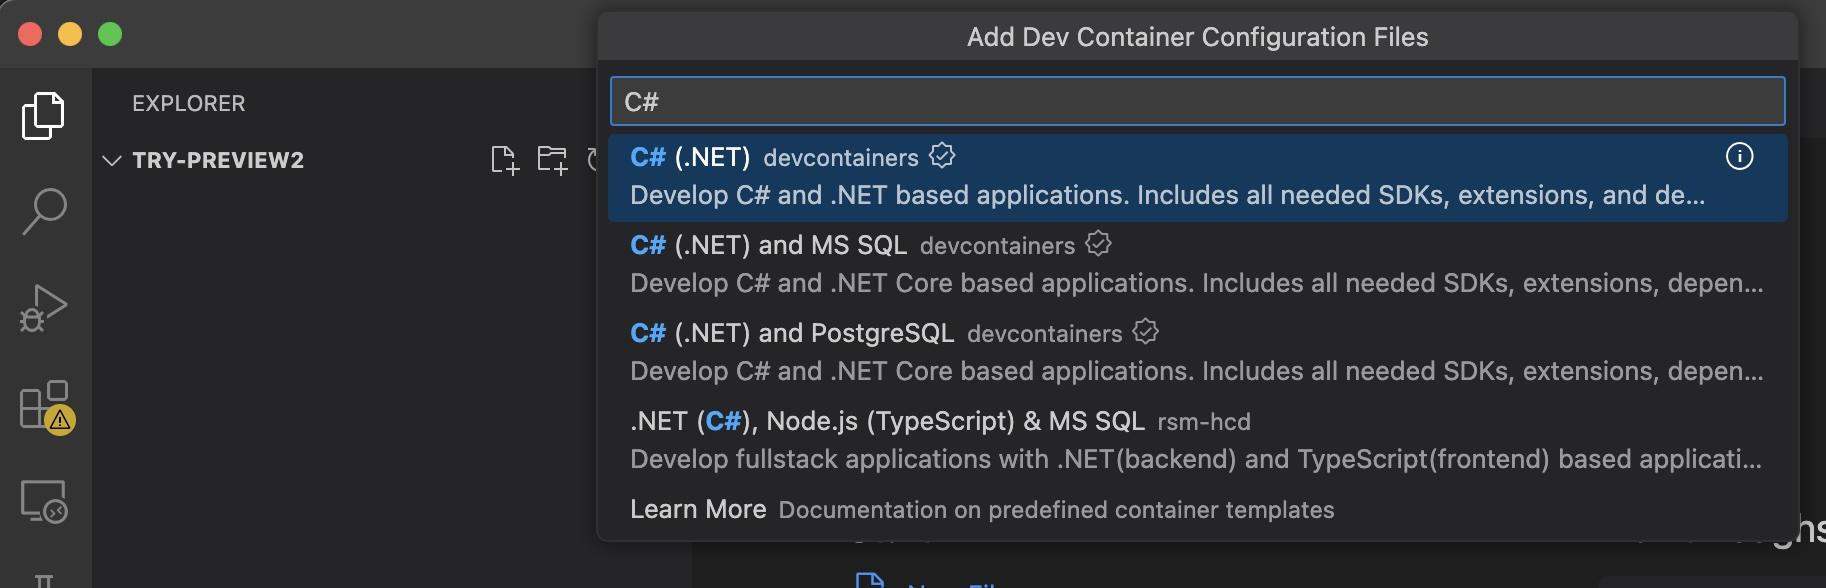
In your project directory, create a .devcontainer folder and add a devcontainer.json file. The easiest way to do this is with the Dev Container extension in Visual Studio Code. Open the Command Palette (Ctrl+Shift+P) and select “Dev Containers: Add Development Container Configuration Files…”. You can store the configuration files in the workspace or in the user data folder, outside the workspace — I generally choose the workspace option. Choose the “C#(.NET)” template, and it will create a .devcontainer folder with a devcontainer.json file that you can then customize as needed.
For GA versions of .NET, there are prebuilt dev containers available. For preview versions, you can create a custom dev container configuration.
Add a Dockerfile
In my devcontainer configuration, I use a Dockerfile to pull in all the versions of .NET I need. I typically want the most recent LTS version and the most recent STS version as a base image — currently that means .NET 8 and .NET 9. These are useful for running dotnet based tools that depend on one of these GA versions. On top of this I install the preview version of .NET 10 I want.
The Dockerfile lives in the same directory as the devcontainer.json file. You point to from the devcontainer.json file using the “dockerFile” property of the “build” property, as follows:
    "build": {
        "dockerfile": "./Dockerfile",
        "context": "."
    },
This replaces the “image” property in the stock devcontainer.json file.
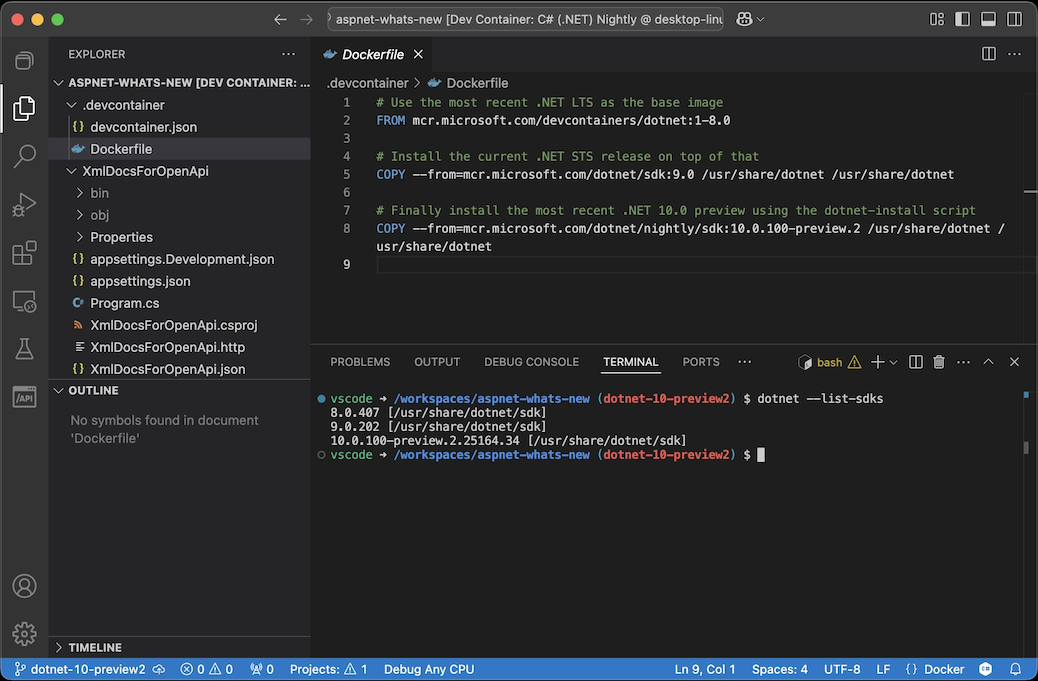
I use the devcontainer of the most recent .NET LTS as the base image for my dev container.
FROM mcr.microsoft.com/devcontainers/dotnet:1-8.0Then I “install” the most recent STS version of .NET, which is currently .NET 9, and the preview version of .NET 10 I want to try out. To install these SDK versions, I copy the SDK from the corresponding SDK image, using the Docker COPY command, as follows:
# Install the current .NET STS release on top of that
COPY --from=mcr.microsoft.com/dotnet/sdk:9.0 /usr/share/dotnet /usr/share/dotnet

# Finally install the most recent .NET 10.0 preview using the dotnet-install script
COPY --from=mcr.microsoft.com/dotnet/nightly/sdk:10.0.100-preview.2 /usr/share/dotnet /usr/share/dotnet
You can see my complete devcontainer.json and Dockerfile for .NET 10 preview2 in my aspnet-whats-new repo.
Other dev container configuration options
You can customize your dev container further by adding additional configuration options in the devcontainer.json file. What’s really great about dev containers is that you can tailor them to your specific needs, meaning that you only install the specific tools and dependencies you need for your project.
Here are a few common options you might want to consider:
-
Extensions: You can specify any Visual Studio Code extensions you want to install in your dev container. For example, to install the C# DevKit extension, add the following line to your devcontainer.json file:
"extensions": [ "ms-dotnettools.csdevkit", ] -
Features: You can specify additional features to include in your dev container. For example, to include the Azure CLI, add the following line to your devcontainer.json file:
"features": {
  "azure-cli": "latest"
}
You can see the full list of available features in the dev container features documentation.
-
Post-Create Command: You can specify a command to run after the dev container is created. This is useful for installing additional dependencies or running setup scripts. For example, to install the latest version of the .NET CLI, add the following line to your devcontainer.json file:
"postCreateCommand": "dotnet tool install -g dotnet-ef"Be aware that the postCreateCommand runs every time you start the dev container, in contrast to commands in the Dockerfile, which are only run when the dev container is built.
Build and Start Your Dev Container
Once you have your dev container configuration set up, you can build and start your dev container. The easiest way to do this is with the “Dev Containers: Open Folder in Container” command. This will build and start your dev container based on the configuration files you created. You can check that the .NET versions are installed correctly with the dotnet –list-sdks command:
Note that once the container image is built, it is cached locally, so that you don’t have to rebuild it every time you start the dev container. However, this means that if there are new service releases of .NET 8 or .NET 9, you will need to rebuild the dev container to pick up those changes. You can do this with the “Dev Containers: Rebuild Container Without Cache” command. This will force a rebuild of the dev container image, and it will pull the latest version of the base images.
Conclusion
Using dev containers is a fantastic way to try out new .NET releases without affecting your local development environment. With a consistent and isolated setup, you can explore new features and enhancements with ease.
Give it a try and let us know what you think!
Will there be windows server container images for .net?
It would be great to have dev containers in VS 2022